
by Lisa Irene
Spinal Rotations, Spinal Twists, call it what you want – but don’t forget to include it in your daily life!
A spinal twist is measured by the distance your face can turn away from your pelvis.
Many of us have sticky upper spines and ribs, so when we try spinal twists, all our movement comes from the lower back and the neck instead.
Not optimal…
A “neutral spine” means the position of a spine from which all spinal movements—flexion, extension, lateral bending, and rotation—can be maximized.
If you start slouching, your twist is affected because vertebrae can’t rotate as much when they begin tipped a bit forward or backward (ANOTHER REASON WHY PROPER ALIGNMENT IS IMPORTANT!). Loads to vertebrae and their parts (nerves, discs) can also get high when twisting in these cases.
Many people have too much of a “curve” in the upper back (i.e. it rounds out ‘backwards’) AND have “sticky ribs” (er ehm, a professional term!). Yes, ribs have joints that can articulate! Both with the sternum and with corresponding vertebrae.
Therefore, we end up trying to twist with an upper back that can’t participate fully in the movement.
When you work on your spinal rotations, please don’t “help” the twist by pulling yourself deeper with your arms, rather, only twist as far as your torso muscles can take you. Hang out there for a while and breathe. Let those surrounding muscles, along with the intercostal muscles, get some stretch and circulation. No rush! They’ll come around once you begin giving them some tender loving care 😉
OK, a check list:
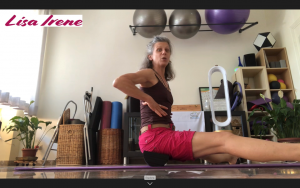
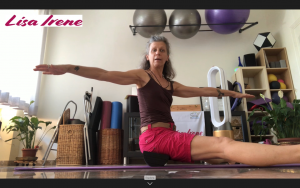
1. Start seated, with a neutral spine as best you can. Neutral pelvis (no sitting on the back part of your bum!), rib cage centered above it (no slouching creating a curved upper back!), top of the head reaching up for the ceiling (notice the new found length in your neck!).
- Letting your arms relax on your legs (no pulling), turn the rib cage relative of the pelvis using your waist muscles.
Once turned, do a few “rib breaths” (put your hands on your rib cage while in a twist to remind you which parts to move), and keep your head reaching for the sky.
- Repeat all of the above in the other direction.
You can add a slight head turn, but we can focus on that in another session. For now, this is about getting your “waist-twisters” mobilized as well as any sticky parts in the upper back.
4. Be gentle with yourself, sometimes “less really is more”! Try doing this 4 or 5 times in each direction: notice the changes with each repetition (they could be quite subtle but nonetheless, they are important changes).
Bonus twist: cross a leg over the other, now as you twist toward it – see how that changes things in what you were feeling previously. WHERE ARE YOU STICKY NOW? BEFORE?
AH, you are asking, “but why should I be able to twist?”
- Keep the mid-spine mobile will assist in alignment (ie. Better posture),
- Better alignment means we can execute an exercise better, which then leads to progressions (variants, challenges) of that exercise
- Spinal and rib mobility means more circulation
- More circulation means less tension
- More mobility in the thoracic zone means more breathing capacity
- This can help us in our cardiovascular workouts – meaning better Heart Rate Variability
Don’t use it, you loose it! Your body parts will go stiff and untoned.
Chipping away at stiffness and immobility will enhance any toning we’d like to do.
Now, who wouldn’t like to tone that middle part? 😉
But let’s be sure to do it healthfully! Let’s see the bigger picture…
https://lisairenebenessereemovimento.blog
http://it.linkedin.com/in/lisairene